1 Busca "Cuentas y sincronización"
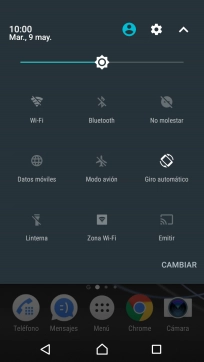
Desliza dos dedos hacia abajo desde la parte superior de la pantalla.
![](http://wmstatic.global.ssl.fastly.net/ml/7061124-f-dd40c93d-2d44-4863-b726-1300c8dc57ee.png?width=204&height=366)
Pulsa el icono de ajustes.
![](http://wmstatic.global.ssl.fastly.net/ml/7061124-f-2e3d3290-4979-4395-ae86-f52b8d332f20.png?width=204&height=366)
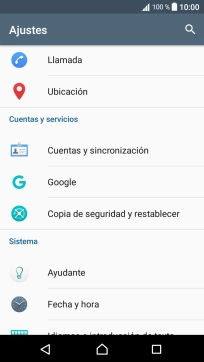
Pulsa Cuentas y sincronización.
![](http://wmstatic.global.ssl.fastly.net/ml/7061124-f-26e27505-4fc2-4420-97e2-a7ab6fba1dbb.png?width=204&height=366)
2 Crea una nueva cuenta de correo electrónico
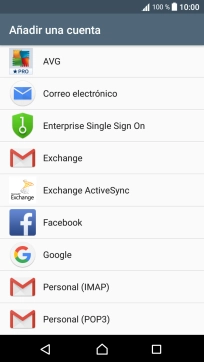
Pulsa Añadir cuenta.
![](http://wmstatic.global.ssl.fastly.net/ml/7061124-f-55b64a7f-14af-4444-8106-54c738c946d5.png?width=204&height=366)
Pulsa Correo electrónico.
![](http://wmstatic.global.ssl.fastly.net/ml/7061124-f-353d53fd-52a7-490b-9c94-751d5b705081.png?width=204&height=366)
3 Introduce la dirección de correo electrónico
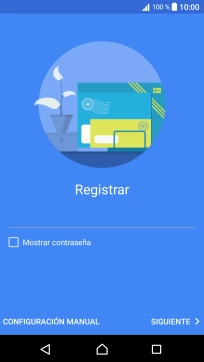
Pulsa Dirección de correo electrónico e introduce tu dirección de correo electrónico.
![](http://wmstatic.global.ssl.fastly.net/ml/7061124-f-024dc9b4-38a8-409b-a8b4-52de9a300d0f.png?width=204&height=366)
Pulsa SIGUIENTE.
![](http://wmstatic.global.ssl.fastly.net/ml/7061124-f-538b23ab-c2ad-42a7-bae5-abcba263b728.png?width=204&height=366)
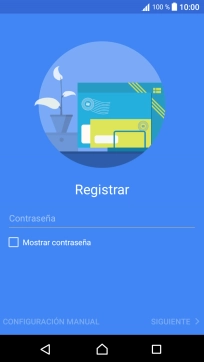
4 Introduce la contraseña
Pulsa Contraseña e introduce la contraseña de tu cuenta de correo electrónico.
![](http://wmstatic.global.ssl.fastly.net/ml/7061124-f-5ec0f512-a43e-4dd1-a6bc-fd1317dce5ff.png?width=204&height=366)
Pulsa SIGUIENTE.
![](http://wmstatic.global.ssl.fastly.net/ml/7061124-f-4b54f50e-a3c1-4c78-bfcb-01a35e742cb8.png?width=204&height=366)
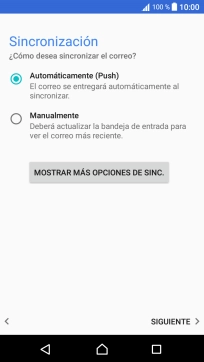
Si aparece en la pantalla esta imagen, tu cuenta de correo electrónico ha sido reconocida y configurada automáticamente. Sigue las indicaciones de la pantalla para introducir más información y terminar la configuración.
![](http://wmstatic.global.ssl.fastly.net/ml/7061124-f-f4b307c7-35a5-48c6-a766-cf8decaec57d.png?width=204&height=366)
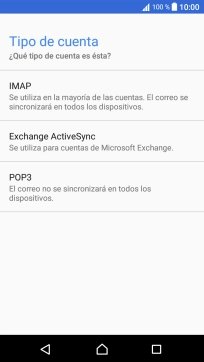
5 Selecciona el tipo de servidor
Pulsa IMAP.
![](http://wmstatic.global.ssl.fastly.net/ml/7061124-f-c26173fe-d183-43bd-b5b2-c158e0a9232e.png?width=204&height=366)
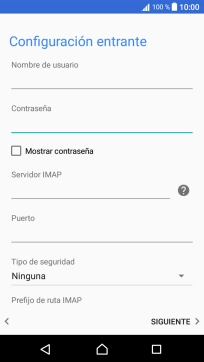
6 Introduce el nombre de usuario
Pulsa en el campo bajo "Nombre de usuario" e introduce el nombre de usuario de tu cuenta de correo electrónico.
![](http://wmstatic.global.ssl.fastly.net/ml/7061124-f-6694e31e-6e72-4ab8-81ef-116d9fbe104b.png?width=204&height=366)
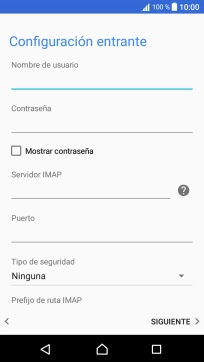
7 Introduce el servidor de correo de entrada
Pulsa en el campo bajo "Servidor IMAP" e introduce el nombre del servidor de correo de entrada de tu proveedor de correo.
![](http://wmstatic.global.ssl.fastly.net/ml/7061124-f-267fbee8-e395-4357-a23a-09196b3ab475.png?width=204&height=366)
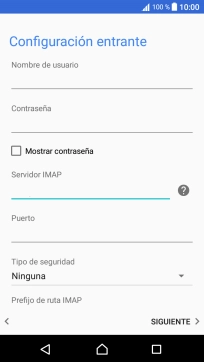
8 Introduce el número de puerto de entrada
Pulsa en el campo bajo "Puerto" e introduce 143.
![](http://wmstatic.global.ssl.fastly.net/ml/7061124-f-f6a2d4e6-34e7-4e52-bf3b-1d2f3d4dce48.png?width=204&height=366)
143
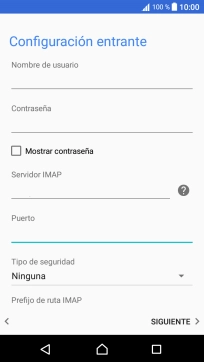
9 Desactiva la encriptación del correo de entrada
Pulsa la lista desplegable bajo "Tipo de seguridad".
![](http://wmstatic.global.ssl.fastly.net/ml/7061124-f-a1149e2a-29f7-4e2c-9b95-307554f6eaf6.png?width=204&height=366)
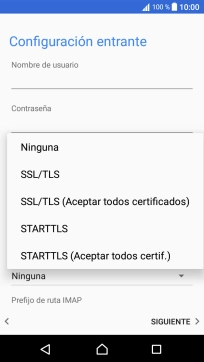
Pulsa Ninguna para desactivar la función.
![](http://wmstatic.global.ssl.fastly.net/ml/7061124-f-51ee0253-c5d3-4277-88b3-931fd67aaab4.png?width=204&height=366)
Pulsa SIGUIENTE.
![](http://wmstatic.global.ssl.fastly.net/ml/7061124-f-a1149e2a-29f7-4e2c-9b95-307554f6eaf6.png?width=204&height=366)
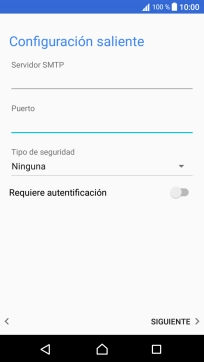
10 Introduce el servidor de correo de salida
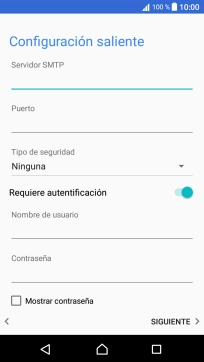
Pulsa en el campo bajo "Servidor SMTP" e introduce smtp.vodafone.es.
![](http://wmstatic.global.ssl.fastly.net/ml/7061124-f-1d7956a7-47c6-4415-9186-b9027fc6f44c.png?width=204&height=366)
smtp.vodafone.es
11 Introduce el número de puerto de salida
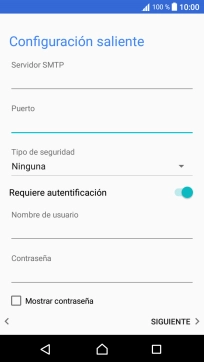
Pulsa en el campo bajo "Puerto" e introduce 25.
![](http://wmstatic.global.ssl.fastly.net/ml/7061124-f-1d7956a7-47c6-4415-9186-b9027fc6f44c.png?width=204&height=366)
25
12 Desactiva la encriptación del correo de salida
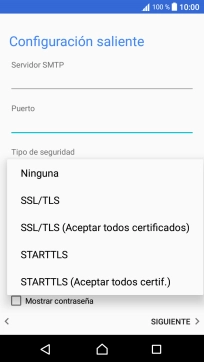
Pulsa la lista desplegable bajo "Tipo de seguridad".
![](http://wmstatic.global.ssl.fastly.net/ml/7061124-f-97344599-6279-45ed-a516-4711c35fa5cc.png?width=204&height=366)
Pulsa Ninguna para desactivar la función.
![](http://wmstatic.global.ssl.fastly.net/ml/7061124-f-07928651-65b2-4789-8349-29ac6cebfbfb.png?width=204&height=366)
13 Desactiva la autenticación SMTP
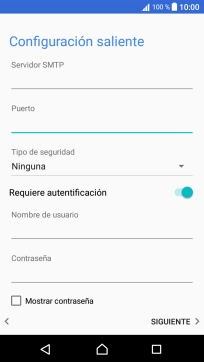
Pulsa el indicador junto a "Requiere autentificación" para desactivar la función.
![](http://wmstatic.global.ssl.fastly.net/ml/7061124-f-150eae7a-0752-4952-80f0-30ffda4f675d.png?width=204&height=366)
Pulsa SIGUIENTE.
![](http://wmstatic.global.ssl.fastly.net/ml/7061124-f-0285d9ae-e4d3-4182-8e16-273b00e18782.png?width=204&height=366)
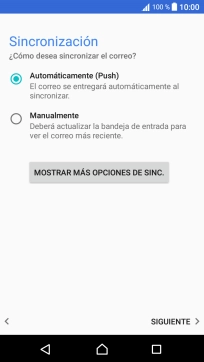
14 Selecciona el ajuste para la descarga de nuevos correos electrónicos
Pulsa MOSTRAR MÁS OPCIONES DE SINC..
![](http://wmstatic.global.ssl.fastly.net/ml/7061124-f-f6d97eca-a8b3-4efb-95cc-e090d0e60577.png?width=204&height=366)
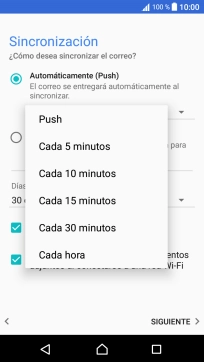
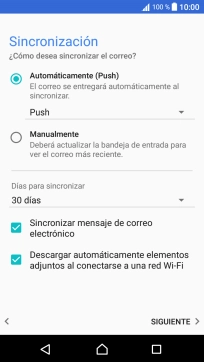
Pulsa la lista desplegable bajo "Automáticamente (Push)".
![](http://wmstatic.global.ssl.fastly.net/ml/7061124-f-ffd4589a-ada6-4697-b5a9-676f94160520.png?width=204&height=366)
Pulsa el ajuste deseado.
![](http://wmstatic.global.ssl.fastly.net/ml/7061124-f-97d9d17a-79f1-4799-adda-bd34b1ca5671.png?width=204&height=366)
Para activar el control manual de nuevos correos electrónicos, pulsa Manualmente.
![](http://wmstatic.global.ssl.fastly.net/ml/7061124-f-ffd4589a-ada6-4697-b5a9-676f94160520.png?width=204&height=366)
15 Activa la sincronización de correo electrónico
Pulsa Sincronizar mensaje de correo electrónico para activar la función.
![](http://wmstatic.global.ssl.fastly.net/ml/7061124-f-ffd4589a-ada6-4697-b5a9-676f94160520.png?width=204&height=366)
Pulsa SIGUIENTE.
![](http://wmstatic.global.ssl.fastly.net/ml/7061124-f-ffd4589a-ada6-4697-b5a9-676f94160520.png?width=204&height=366)
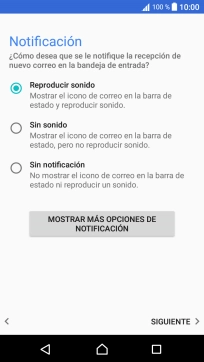
16 Selecciona las notificaciones de nuevos correos electrónicos
Pulsa el ajuste deseado.
![](http://wmstatic.global.ssl.fastly.net/ml/7061124-f-57f31309-d693-4275-aa7f-b255f7b78bfa.png?width=204&height=366)
Pulsa SIGUIENTE.
![](http://wmstatic.global.ssl.fastly.net/ml/7061124-f-57f31309-d693-4275-aa7f-b255f7b78bfa.png?width=204&height=366)
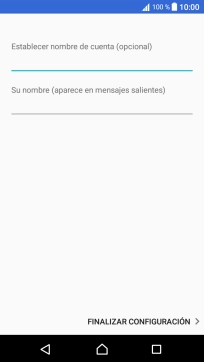
17 Introduce el nombre de la cuenta de correo electrónico
Pulsa en el campo bajo "Establecer nombre de cuenta (opcional)" e introduce el nombre de la cuenta de correo electrónico.
![](http://wmstatic.global.ssl.fastly.net/ml/7061124-f-4caa7860-f91e-4407-abce-36c42b89445c.png?width=204&height=366)
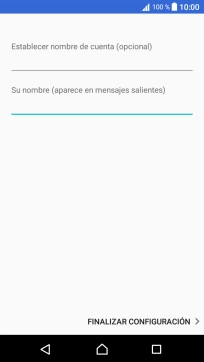
18 Introduce el nombre del remitente
Pulsa en el campo bajo "Su nombre (aparece en mensajes salientes)" e introduce el nombre del remitente.
![](http://wmstatic.global.ssl.fastly.net/ml/7061124-f-4caa7860-f91e-4407-abce-36c42b89445c.png?width=204&height=366)
Pulsa FINALIZAR CONFIGURACIÓN.
![](http://wmstatic.global.ssl.fastly.net/ml/7061124-f-a08a224b-ff5d-4ac8-a419-13e0ac9e6431.png?width=204&height=366)
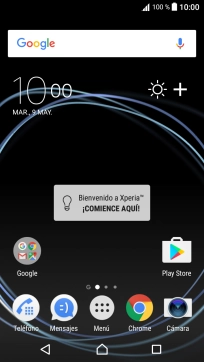
19 Regresa a la pantalla de inicio
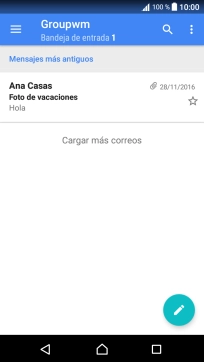
Pulsa la tecla de inicio para terminar y regresar a la pantalla de inicio.
![](http://wmstatic.global.ssl.fastly.net/ml/7061124-f-0b884732-24e9-4799-b087-349706ab50ae.png?width=204&height=366)